What Pockets & Pages Is All About

Showing a fnished mini-album on a main blog page takes up so much room - so here's where you can see the pages of each album I make in closer detail.

Saturday 9 February 2013

Autumn Swirls

Although not my favourite album, I love the stand the mini album sits upon. It's made from 2 books and part of a shawl bought at the 99p discount store, pieces of a wire coat hanger, Tim Holtz "Autumn Gatherings" Sizzix strip die, Tim Holtz 'feet' and a whole load of ModPodge!
The swirls are made from parts of the coat hanger - poked into holes drilled into the books and then covered in florists tape, die-cut leaves and the mod-podge to make it all stiff. I also used some other flowers and bits and pieces from my stash. I draped a crocheted doily and a part of a shawl over the top, inked them up and covered them with ModPodge too. 
The bottom book opens up to reveal a little secret compartment cut into the book pages.
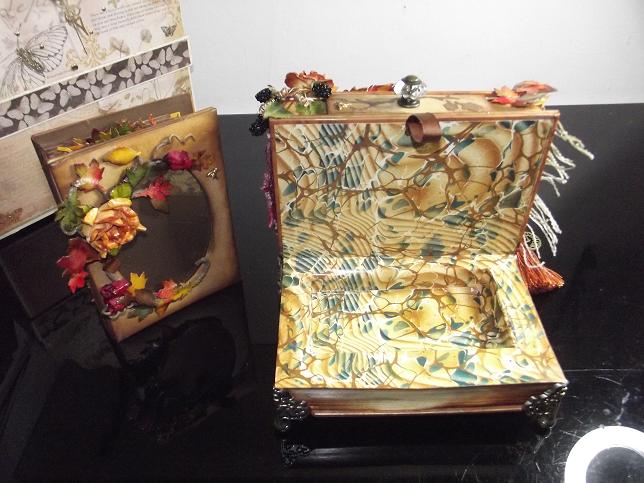
 The top book has also been hollowed out to make room for a drawer, with a Tim Holtz drawer knob on the front.
The front of the album itself is a Kraftstock photo frame that can hold a 6"x4" photograph.
Each page is simply a pocket that holds a tag decorated (both sides) with die-cut leaves, branches and acorns.This decoration is heavily painted with ModPodge. Each tag has a picture on the front, and are also sprayed lightly with a shimmer spray. The first pocket is made from lace, sewn onto the page.
 I'm not sure where I bought these green swirls from, but I cut them up and attached them to the very edges of the page. The tags are lightly colour-coordinated for each page.
The pocket for the next page was made with a cut-out leaf, painted with crackle glaze. The following pocket was consructed by layering vellum leaves onto thicker paper and then cutting them out.
 The 'pockets' for the following two pages were simply made using brads and ribbon.
These leafy orange swirls were bought the same time as the green swirls from previous pages.
 The last page pocket is made from a wide piece of ribbon.
The reverse of each tag is plain, and there is a pocket between each page that holds a large tag with a decorative edge.
Although I may keep the cover, sometime in the future I may re-do the inner of this mini album completely... it really depends on what my imagination can come up with :)

Christmas Cottage Mini

You can't see it properly in the photograph, but this little cottage has a row of coloured lights under the roof eaves that are battery powered - it looks adorable when it's all lit up :)
It's a basic box construction with a removeable roof. The papers are mainly from the Dovecraft Noel line.
The roof needed something a little extra - so I made a chimney and put a tiny box inside, tied with ribbon.
Inside this box is a little book - "A Visit From St Nicholas" - which is possibly my favourite book ever :) It's just the words - no pictures except for the front cover.
The roof lifts off to show the mini album inside - with plenty of room for when the mini is filled with photographs and journalling :) The book is easily lifted from it's 'house' by a thick velvet ribbon that wraps completely round the book, and has velcro to hold it closed.
 The cover of the album has a round ornament frame (49p from The Range) and poinsettia flowers made from Anita's Sickers and held with snowflake brads. The binding is covered with an oddment of lace.
Okay... onto the first pages.
I decided not to have tags in this book, but just have the pockets available for photographs, with a feww added journalling spots. The first page has a flap pocket...
...which opens to show a large blank page.
Turning over, the second page shows a large pocket that is also a flap that can be lifted up...
 ... to reveal a journaling spot and a place for a large photograph. The adjoining page has two pockets holding journaling tags.
The nex page is another pocket that flips up...
 ... showing a journaling spot and blank space. The next page is the same as the very first - showing a flap pocket that opens out.
Turn this over, and we're back to the large upward-flap pocket and journalling pockets. This design is repeated until the end of album.
The punched border edges in the central spine of the book are not only for decoration, but are also part of the album binding.

Friday 8 February 2013

Delightful Dresser Mini

The outer box that holds this mini was sort of made up as I went along. The 'glass' panels are acetate and behind these are just paper cut-outs of plates and crockery items that I painted over in Glossy Accents. The outer paintwork is crackle paint with gold rub'n'buff, and the feet were made by rolling strips of paper to make paper beads. The 'handles' of the fake drawers are TH hitch pins.
The whole front opens up to reveal the mini inside. I think a lot of the papers were Papermania and Henbury Lane, and I had already decided on a very springtime-like theme of pink and green to match the crockery.
I used border-punches a lot in this mini, and many of the tags are simply slipped under the decorative edging. All the tags are plain cardstock in green and pink, with just a little inking around the edges. This first page shows a tag that holds down a flap...
... this is just for extra journaling or phoograph-placing space. There is also a top-opening pocket that holds another tag.
Turning over to the next page, we see that it is a full-length pocket holding a tag. This page also has decorative border-punching tha holds another tag. The page on the right is a shortened pocket that has 1 tag in it.
On the other side of this short pocket is another pretty border holding a tag. The right page is a very short pocket that holds 2 tags.
Many of the plain papers used were Core'dinations, and the inks were distress ink. The following page is another short pocket containing a tag, with a space for an extra tag in front.
The reverse of the tag pocket is plain, and the next page holds a tag in a decorative border, as well as being a full-sized pocket holding a large tag.
Turning over, the page is a mirror-image of the first page, with a tag holding closed a flap that, when opens, reveals a small pocket.
The next page is another shortened pocket with a full-sized tag.
Once again, the reverse of this pocket holds another tag. The right hand side of the page is a very short pocke holding two tags...
This pocket is the centre of the album, and the pages from here are all an exact mirror image in design from the first half.

Sunday 3 February 2013

Ooh La La! Mini

Possibly one of the favourites of my mini-albums - but mostly because the paper shoes are just so adorable! The shoe-box top is held closed with the gold ribbon.
The shoe-box lid lifts off to reveal the album inside.  This is held closed with ribbon attached to the box edges, and has a few shoe and fashion charms added too. The box collapses open when the ribbons are pulled undone... 
... this is because the album itself is attached to the box - the back cover is the bottom of the box. I chose red card with black and white patterned papers for this album - the papers are "Paris Nights" by GCD Studios. 
I chose a fold-over gatefold design for this album, repeating the page design just with different patterned paper, so I shall just show the first few pages...
As you flip open the first page, there is a pocket on your left holding a photo mat. All the photo mats are edged in gold (which is difficult to see in the photos).  The topside of the next page is blank - to hold a photograph or memorabilia perhaps?
When opened, the flap on the right mirrors the first open page with a pocket and photo mat. In the centre is also a pocket with a photo mat.
Flip over this central pocket page, and on the reverse it's an envelope pocket holding another plain mat.
This is repeated for the right hand side also.
 Showing in the centre is the following pair of pages, which are cropped pockets each holding a photo mat...
Open the plain page in the middle, and you are once again shown a pair of pages with pockets and photo mats...
This pattern of pages is repeated several times until the end of the book.
Many of the photo mats and flaps are stamped with designs and flourishes.

Little Treasured Memories Box

Made from scraps and leftovers, this was a dry-run for a bigger project.
The outer box:
Simple velcro fastenings keep the straps (and the lid) closed.
 The inner of the box is very simply lined with plain paper. All the paper used was chosen for the purple colour tones. Many of the papers were Papermania - Henbury Lane collection, Heather Capsule Collection, and others. The little flowers poking up are paper clips with the little purple flowers attached. These purple flowers came in border strips, and were already sticky - I simply cut two from the strip and folded them over the end of a paper clip.
The closure for the book is just a brad from the Snowman Collection, 'coloured' with distress ink. The charms are from my stash.
 The first page is a journalling spot...
... but pull it slightly and it comes away from the corner. The reverse is plain so you can add a photograph.
 The album is designed so that the pages are in sets of two - one opening from the right, the next opening from the left - an over-lapping gatefold. I'll only show one side of each pair of pages unless they are very different from each other. This following photograph shows the second page - similar to the first with a pull-out journalling spot...
 With a stamped sentiment at the bottom, and a blank reverse.
The back of these pages hold a small tag (held on with a paper clip) and a space for a photo.
Next are two shorter pocket-pages...
 Each holding three blank mats for photographs or journalling.
 Another pair of pocket pages follow, each holding a photo mat where the photo is held on with a piece of lace ribbon.

 The next pair of pocket pages also hold photo mats. The purple flower/rose is attached to the photo mat...
 ... and not the page itself.
 A pair of journalling spots next - each decorated with Henbury Lane rub-ons and flowers from my stash. On the reverse of these pages there are a large photo mat and a tag held onto the page with a paper clip.
 Two pocket pages again - they were fun to make, and I found they could hold a few mats in each one. The photo/journalling mats in these are in a set of three, held together with a button...
  ... and on the reverse a spiral jump ring and a little butterfly charm.
The next pair of pages are fold-out journalling and photo mats. They are held closed with a magnetic snap, hidden under the patterned paper and ribbon.

held with a ribbon, inside are two more photo mats stamped with one of my favourite "La Blanche" stamps. On the back of these pages, each has a pocket and a photo mat.
Another pair of pocket pages following. Similar to the purple flower/rose, the butterfly on each of the photo mats is not joined to the pocket, but is part of the mat...
... and reveals a lovely sentiment when pulled out ("perfect day").
The final pair of pages are for journaling, and are once again decorated with Henbury lane rub-ons. The reverse of these pages each has a large tag held on with a paper clip.
The back cover is decorated with feathers, gems and a journalling spot.